I needed a new workbench. One where my printer could live, where tools and spare parts could be organized, but also where the work surface wouldn't get cluttered or take too much of the space in my room. I started looking around at secretaries and similar, which have the right concept, but never the right size. Eventually I realized I had to do it myself. These are my notes.
I used an IKEA Hemnes side table, two Hemnes night stands, and the top part of the two-part Hemnes writing desk. The two night stands on top of the side table, and the writing desk part on top of them, like the cross slab of a megalith, done in wood plank furniture. That part was simple enough, except I didn't want the gaps under the night stands, so I cut a bit of the logs, but cut too much, so now I need to fill some gaps. I'll probably print something eventually. But here's the basic setup:
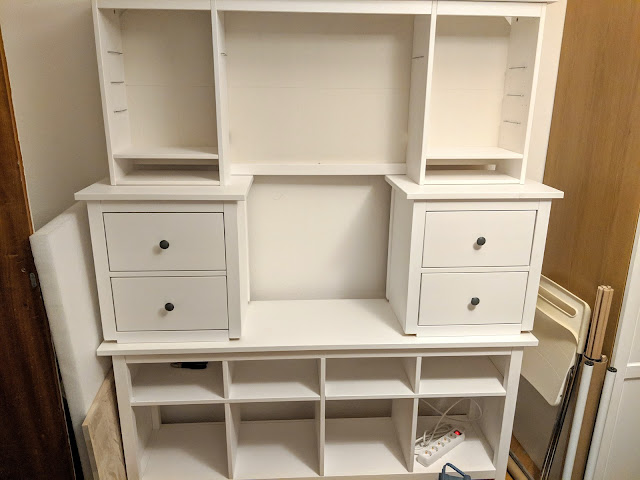 |
| Hemnes, Hemnes everywhere. But they are clearly not designed to go together like these, the sizes don't match up well |
The problem with this setup is that there isn't all that much table space, forcing me temporarily to do inconvenient hacks to have my monitor and keyboard there (the computer is the Raspberry Pi visible below the mouse, so it doesn't care much):
 |
| The one and only drawer-top computer |
Re-plating
The solution for this? Replace the top plate of the side table with a wider one, then put the narrower original plate on with hinges, like a secretary. I got a board cut to size, 2cm thick, which I then proceeded to sand all the edges of and hand-paint several layers of white onto, trying to get the same "white with the veins slightly visible" feel. I got close enough that I didn't feel like going further.
For a short while, I considered leaving the narrow plate in place and folding up (or down) the wider one. I even got as far as getting a piece of wood to secure the hinges on. Even though I abandoned this approach (no room for the monitor), this made me notice that the middle part had sunk down about two millimeters. To straighten it out and prevent future sagging, I put in a pile of wood pieces. This was made slightly trickier by the presence of a rim on the underside, so I couldn't measure the needed height accurately. Instead, I used several pieces of wood of different heights, and eventually some folded newspaper to give the last couple of millimeters.
I also cut out notches for the hinges. I marked the hinge size, then used my Dremel to cut the edge and a screwdriver to break up the wood. It was a bit uneven, so I sanded (by hand or Dremel) quite a bit, including making a groove at the edge that the round part of the hinge could go into. It was only then I noticed that the bevelling on the hinge went the wrong way, so I would have screw heads sticking out of my working surface. Not acceptable. So instead I went with mounting the hinges on the underside, letting the surface fall down. This puts some pull strain on the hinges, though, which might be a problem over time. And I wasted all that work on making hinge notches. But, on to the actual replacement!
Here's where it gets tricky (and where I wish
ikeahackers.com had a "Techniques" section): I had to replicate the peg holes - 6 large and 4 small - accurately enough to be able to drill them and drop the new board in. Just measuring them would not cut it, at least not in my experience with similar projects earlier. Instead, what I needed was some sort of marker I could use to derive the drilling spots from the table itself. At first I was thinking thumb tacks, or maybe printing something fitting, but then I realized pencils might do the job. A regular pencil fit the smaller holes nicely. For the larger holes, my darling wife valiantly sacrificed some of her Faber-Castell large coloring pencils.
 |
| The first two pieces, with my trusty Dremel and its wood-cutting bit on the right. |
I started by cutting off pieces of regular pencil with my Dremel. A normal pencil sharpener makes a fairly long tip, though, so there is little left to fit in the hole and help make it stand vertically. Fortunately, we also have a very good Faber-Castell pencil sharpener (top-left in the picture), which has a special hole that makes shorter cones. It also just sharpens really nicely. The top piece is noticeably shorter.
After cutting a few of these, I realized that dropping them into the old board, while handy for the process of matching the boards, would leave very little length of pencil overall and make the whole setup unstable. Instead, dropping them into the sideboard holes, which are much deeper, lets me use longer pieces. I'll just need to be a bit careful and have extra hands when dropping the board on them.
For the big holes, the fat pencils turned out to be slightly too big around. Using a Stanley knife, I scraped off the hexagonality (slicing it off like a woodcarver took off too much) and the paint, making them fit snugly. I used a piece of rough sanding paper to sand the ends flat enough to stand vertically. A piece of U-shaped aluminium rod provided a flat surface to test them on:
 |
| A pencil partially scraped into roundness |
 |
| The full set of markers, in the formation they will eventually be used. |
The markers eventually fit quite nicely in the holes, the thinner ones being a smidge wobbly. Next problem: If I just plonk the board down holding it, I would be sure to wobble the markers. Also, I would need to place the board accurately enough to be reasonably aligned with the undercarriage. The latter problem I solved by moving the whole thing into a corner with the old board in place. For the former problem, I grabbed a piece of foam (ubiquitous in a
foam fighter's home:), cut it into pieces wide enough to let the board rest just above the markers, and had these lie between the cross-beams:
With these in place, I could gently lower the board, then squish it to apply the markers. Once all preparations are done, the action is fast. One marker didn't leave much of a mark, but enough that I could re-mark it. Three others, unfortunately, were too smashed to easily get pulled out - the three bigger ones on one end. I must have squished harder there.
It might have been easier to just put all the pegs in and bonk the board onto them, but for two reasons: I didn't expect the pegs to be all at the same height, and the marks would be circles, not points, making it harder to hit correctly with a drill. Well, we'll see how correctly I hit with these. The perfect markers would have been 8/10mm cylinders, tall enough to fill the entire hole, then tapered to a point, with a small hole horizontally to aid in pulling them out. If only I had a working 3D printer!
The moment of truth! Using a 10 mm wood drill bit and the distance-stop on the drill, I first did a test drill in a piece of left-over wood of the same thickness, then drilled the larger holes first. Of the 6 big holes, 2 needed a tiny bit of sideways drilling to go in. The four smaller holes just fit perfectly. Quite amazing.
 |
| Distance gauge kept me from getting unsightly holes in the working surface. |
Next, I used a nail to mark the places where the 8 screws go in, pre-drilled those with a 2-mm drill bit, and screwed them in.
In order to prevent the overhanging board from bending and breaking over time, I added support brackets underneath. I added three supports with a bit of pre-drilling, using 6 M4 20mm and 5 M4 40mm screws. Why 6 and 5? Because the two outer supports went into the thick corners, but the top screw on the middle one goes straight into an existing screw inside it. I have the iron filings to prove it:)
 |
| Yes, I actually like a bit of decorative elements. Pure functionality makes me depressed. You can also see the center support below - I wanted a narrow one so I still had storage space there. |
I used a slightly smaller bracket for the middle, for not really great reasons. There is still room outside the larger bracket to mount a hinge, and I am unlikely to be much less inconvenienced by a slightly smaller bracket. What this did do, however, was trick me into drilling the wrong holes. Fortunately, I only had to redo one set of holes.
 |
| Embarrassing extra holes, and a lack of screw where I drilled into an internal screw. Don't do that. |
Having decided to not use the hinge notches I had already made, I was left with three unsightly areas of bare wood. Turn the board over, you say? Alas, when I painted this, I made sure one side was nicely painted and didn't care much about the other, so that would have been ugly. The two notches at the sides are covered by the night stands, and while I was expecting the middle one to be covered by my 3D printer at all times, my clever wife suggested cutting it out and having a cable hole instead. Very good idea! I used the Dremel in situ with a vacuum at hand, sanding the edges down quite a lot to prevent power-carrying plastic parts from being worn through. It would actually be nice to have some plastic covering it, the cut is rather messy
 |
| Cable hole, with cable already coming through it. |
The basic setup is now complete, and could technically be useful as is, but I would end up having most of the working surface covered with printer and monitor and keyboard and such, so on to...
Adding the folding part
First part of adding the old plate as a foldable table is putting on hinges. This also needs to be done carefully, as poorly placed hinges can make proper folding impossible, or at least break down quickly. I folded the hinge all the way around the edge when marking, so it lay flat against two sides. I tried to mark as centrally as possible - I wouldn't mind having a little marking device that can mark the exact center through a hole. I double-checked
online that the 2mm pilot hole is appropriate for an M4 screw, it's actually a bit smaller than recommended, but since this will be load-bearing, I'm OK with that. Doing the pilot holes for this turns out to be a really delicate affair, I had to drill several of the holes sideways a bit (doesn't help that I'm drilling upside down lying on the floor). This part could have been done before putting on the board.
I wanted foldable legs to support the foldable desk part. This required not just hinges, but also shims of wood between the legs and the hinges. I got some 20x60mm wood and cut 60x60mm squares from that, sanding down the edges, and mounting the legs on them. I used M5 bolts with nyloc nuts for mounting the blocks on the legs, countersinking a bit with a round Dremel bit. I put the hinges on in the middle with the same 20mm wood screws I've otherwise used. It would have been wise to get a slightly larger piece of wood, since the holes in the top of the leg are rather close to the border, and I ended up splitting and drilling almost out of the wood. Even making the pieces longer would have helped.
 |
| Drilling and countersinking |
 |
| "I want to break free!" - the top nyloc was damaged, and I didn't realize in time I was over-tightening it. |
Mounting these on the plate was fairly easy by now. I put them close to the corners, since the board is just long enough that the legs can fit end-to-end, rather than putting them at an angle. This also will allow me to add a little leg rest so the legs don't pull on the hinges when the table is down. I could also have put them at an angle, lessening the stress and allowing me to put the legs further in - the blocks are sticking out a bit, which is somewhat unsightly.
 |
| Legs mounted on the underside of the table. A total coincidence that they ended up fitting like this. |
Now to the final step: Mounting the hinges on the swinging plate. Align them nicely, put a piece of support underneath while working, and... finally notice that the new plate is 2mm thinner than the old plate. Bother! My calipers have been missing for a while, but I thought I had this measured long time ago. But then again, it would have been difficult to find 22mm boards. What to do, what to do? Just gonna make a shim, gluing some solid cardboard together in 4 layers seems to give an appropriate thickness. This loses some grip from the screws, unfortunately. It might be wise (as a later upgrade) to change the screws out for 25mm ones, adding washers as necessary to prevent a table surface mined with sharp screw tips.
 |
| Cardboard and hinges |
Ok, adding that was just a bit of extra unnecessary bother. But now we should be ready for the final attachment. To get a tight fit, I put the board on a table, propped up to the right height, then used painter's tape to keep the two pieces together, and added a weighty tool box for extra interia.
 |
| I could also have used duck tape, but then I'm not trying to stop continental drift here, am I? |
Lying under the table, I used painter's tape again to hold the hinge up, and this time drilled straight through the hinge holes instead of merely marking. Impractical, but accurate.

And my work pays off! I now have a fully functional folding 4xHemnes super-workbench:
Still, this is missing some goodness. The leg hinges are not just unsightly, also rather loose, and when the legs are folded, there is sideways stress on the hinge blocks. The only reasonable way to fix this is - with magnets! First some nice circular ones with countersunk holes for holding the legs in place:
To stabilize the hinges, I measured the gap and got some cubical magnets fitting that - not 100% stable, but much better:
 |
| Magnetically-stabilized hinges. In the background you can faintly see Dröna boxes fitting nicely below |
Since part of the reason for this workbench is that I get to have my tools organized, I got some Skådis hook plates and a bunch of attachments. I put two plates hinge-mounted in front, leaving me with a metric fuckton of space to hang my tools:
 |
| Drilling holes to match the hinge. Not trivial in tight spaces. |
 |
| Drilled holes from the other side. This wood splinters easily. Should probably have covered it with tape. |
 |
| The plates turned out to be just wide enough to overlap, so I added a gap on the hinges. Bolts are better than washers in such a confined space. |
With these added (and a third one at hand to put at the back, if I need more tool-hanging space), my workbench is complete:
The printer fits snugly, but not too badly so. The desk folded down nicely to allow an air mattress, and up to work on. I need a higher chair if I'm going to do extensive work on this, and the legs are admittedly a bit unstable. But it's a huge step up from a wobbly folding table and a flimsy metal shelf system.


Comments
Post a Comment